Smallplot
Active Member
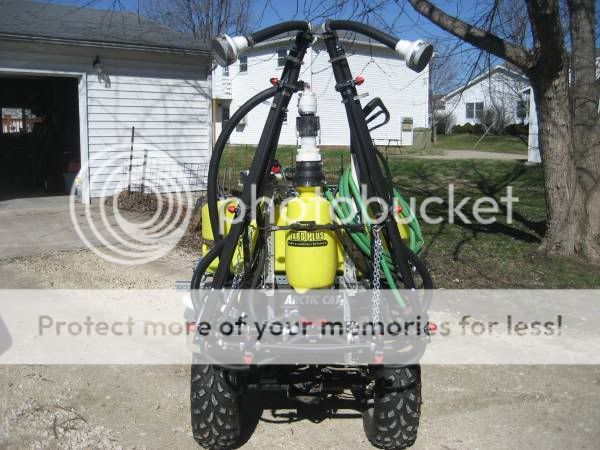
Everyone at some point has used an ATV Sprayer and not all sprayers are created equal. What makes a difference is usually the type of tips used, and this goes for ATV and larger 3 point sprayers alike. For a good all around sprayer look at something you can put a small boom on and run flat fan nozzles. They Flat fan nozzles are economical and are excellent in applying contact herbicides that we typically use. In this thread I will give my opinions on why one type of tip is better than another and simple modifications that can be done to make your sprayer even better.
Since nozzles are so important lets start there. Some will say they want a boomless nozzle but, for me the risk is not worth the reward. Boomless nozzles rely on putting out very large droplets where flat fan nozzles put out many smaller droplets. What this means is when you drive across a known area, in this case lets look at a square foot, applying the same amount of mixture from each, one square foot (boomless style) would have a lot of space between very large drops while the other will have less space between many more smaller drops. What this means while we are applying our herbicides is the larger droplets are more likely to bounce off of the plant you are trying to spray, large droplets have to travel further in the air before making contact with target plant material, and lots of tightly spaced target plants may not receive any herbicide. Smaller droplets provide more surface area contact leading to more area for plant to absorb herbicide, drops travel very short distances before making contact, and small drops have less surface area to be effected by wind. This can be the difference between success and failure especially when plants are under stress or more mature than recommended.
There are nozzles for a boom referred to as broadcast tips or Deflecto nozzles. These are common on many commercially purchased sprayers considered a Boom Nozzle. The replaceable tips are easily identified as the liquid is forced through a single orifice onto a slanted surface. The tips are usually oriented in a horizontal position and are spaced between 28 to 40 inches apart with PSI ratings around 20 PSI and spray heights between 12 and 18 inches.. The stream is deflected at an angle where the pattern fans out like a thin sheet of liquid. Due to their spray pattern large leaves and thick vegetation can block herbicides from making contact with target plants. These tips are great for spraying preplant herbicides onto bare ground but lack when spraying under normal conditions.
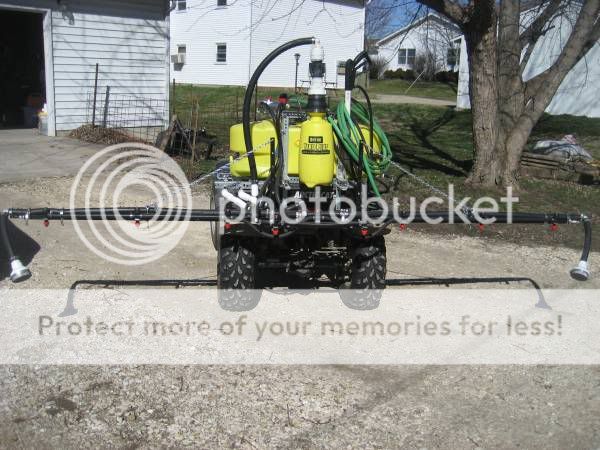
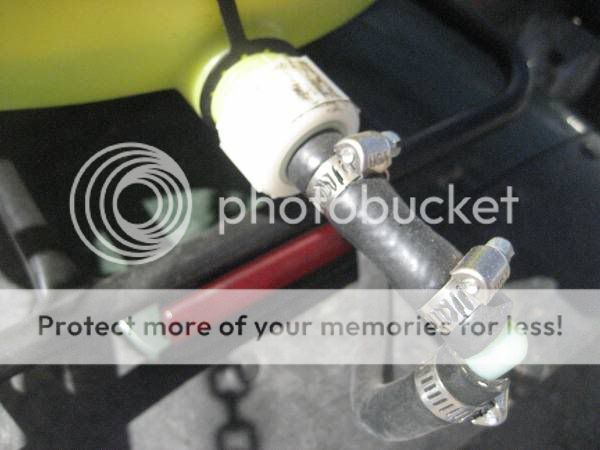
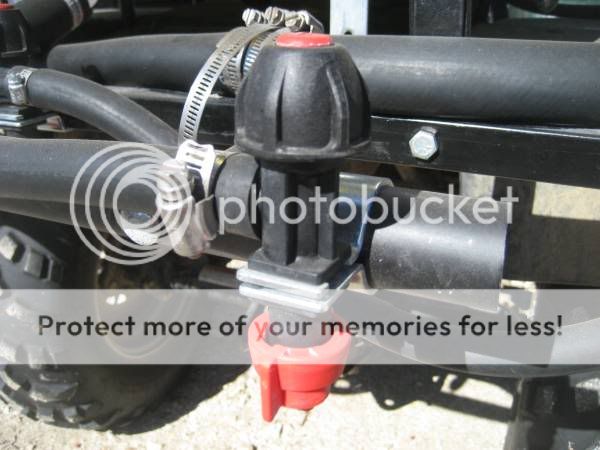
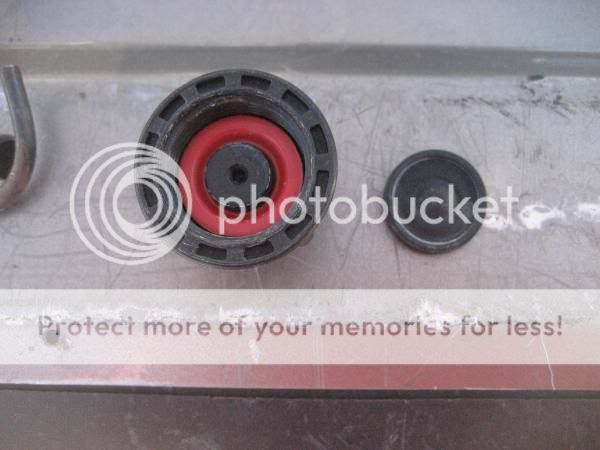
The next spray tip I will discuss are the flat fan types. While I will specifically talk about the flat fan, there are some different patterns based on a similar design that differ in overlap coverage between tips. Flat come in two different spray angles, 90 degree and 110 degree. The difference between these two tips is how high the boom needs to be above the target weeds. 80 degree tips need a taller boom setting (28 to 30 inches) while the 110 degree need 18 to 20 inches of height. Regular flat fan nozzles usually need lower Pressures. Tip sizes are based on the orifice size with smaller orifices applying less product per acre than the larger ones. Tips are generally color coded by orifice size only so be careful not to mix and match. There are tips size selection charts that provide approximate output based on pressure and speed. While small drops are better than large drops try to keep your selections in the Med to Coarse size and shy away from the fine size. The fine size floats around like a mist and can lead to drifting. This is your basic 110 degree flat fan tip. Nothing fancy, no ceramic orifice or brass. Just plastic and it works. The tip is seated in a cap used in a quick connect system. See the yellow residue?

Flat fan tips are commonly spaced 20 inches apart to keep a boom as close to the target weed as practical. The wider spaced the tips are, the higher a boom needs to run for good coverage. 20 inch spacing and a boom height of 20 inches is right about perfect for most 110 degree tips. Too tall and the areas between tips get no or too little herbicide coverage. Too short and you will have strips receiving no herbicide.
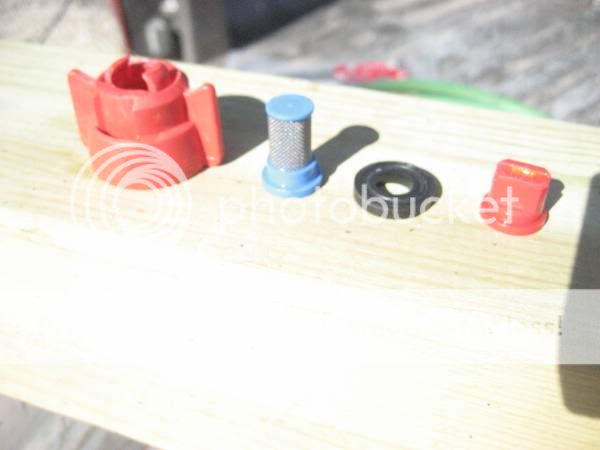
We can mention the Air Inducted fat fan nozzles which cost more than the regular nozzles but the air inducted nozzles are designed to perform better under a wider range of pressures.. One can see where the air inducted nozzles would be a better fit on a PTO powered pump where Pressures can be significantly higher than pressures achieved by a 12 volt electric pump. Looking deeper at air inducted nozzles we find drops are formed around bubbles of air. This lets us utilize bigger droplets for drift control while retaining less herbicide mix in proportion to droplet size. Droplets hit target weeds with less force and once droplets hit and splatter, the droplets will not bounce or run off when applied correctly.
Since nozzles are so important lets start there. Some will say they want a boomless nozzle but, for me the risk is not worth the reward. Boomless nozzles rely on putting out very large droplets where flat fan nozzles put out many smaller droplets. What this means is when you drive across a known area, in this case lets look at a square foot, applying the same amount of mixture from each, one square foot (boomless style) would have a lot of space between very large drops while the other will have less space between many more smaller drops. What this means while we are applying our herbicides is the larger droplets are more likely to bounce off of the plant you are trying to spray, large droplets have to travel further in the air before making contact with target plant material, and lots of tightly spaced target plants may not receive any herbicide. Smaller droplets provide more surface area contact leading to more area for plant to absorb herbicide, drops travel very short distances before making contact, and small drops have less surface area to be effected by wind. This can be the difference between success and failure especially when plants are under stress or more mature than recommended.
There are nozzles for a boom referred to as broadcast tips or Deflecto nozzles. These are common on many commercially purchased sprayers considered a Boom Nozzle. The replaceable tips are easily identified as the liquid is forced through a single orifice onto a slanted surface. The tips are usually oriented in a horizontal position and are spaced between 28 to 40 inches apart with PSI ratings around 20 PSI and spray heights between 12 and 18 inches.. The stream is deflected at an angle where the pattern fans out like a thin sheet of liquid. Due to their spray pattern large leaves and thick vegetation can block herbicides from making contact with target plants. These tips are great for spraying preplant herbicides onto bare ground but lack when spraying under normal conditions.
The next spray tip I will discuss are the flat fan types. While I will specifically talk about the flat fan, there are some different patterns based on a similar design that differ in overlap coverage between tips. Flat come in two different spray angles, 90 degree and 110 degree. The difference between these two tips is how high the boom needs to be above the target weeds. 80 degree tips need a taller boom setting (28 to 30 inches) while the 110 degree need 18 to 20 inches of height. Regular flat fan nozzles usually need lower Pressures. Tip sizes are based on the orifice size with smaller orifices applying less product per acre than the larger ones. Tips are generally color coded by orifice size only so be careful not to mix and match. There are tips size selection charts that provide approximate output based on pressure and speed. While small drops are better than large drops try to keep your selections in the Med to Coarse size and shy away from the fine size. The fine size floats around like a mist and can lead to drifting. This is your basic 110 degree flat fan tip. Nothing fancy, no ceramic orifice or brass. Just plastic and it works. The tip is seated in a cap used in a quick connect system. See the yellow residue?
Flat fan tips are commonly spaced 20 inches apart to keep a boom as close to the target weed as practical. The wider spaced the tips are, the higher a boom needs to run for good coverage. 20 inch spacing and a boom height of 20 inches is right about perfect for most 110 degree tips. Too tall and the areas between tips get no or too little herbicide coverage. Too short and you will have strips receiving no herbicide.
We can mention the Air Inducted fat fan nozzles which cost more than the regular nozzles but the air inducted nozzles are designed to perform better under a wider range of pressures.. One can see where the air inducted nozzles would be a better fit on a PTO powered pump where Pressures can be significantly higher than pressures achieved by a 12 volt electric pump. Looking deeper at air inducted nozzles we find drops are formed around bubbles of air. This lets us utilize bigger droplets for drift control while retaining less herbicide mix in proportion to droplet size. Droplets hit target weeds with less force and once droplets hit and splatter, the droplets will not bounce or run off when applied correctly.